Miro
Early in the project, the team settled on Miro as our collaborative tool for course design. Miro provided key features essential to our work:
- Infinite Canvas - The ability to create multiple frames and expand outside a single 'page' meant that we could create a single workspace with different frames for different aspects of each course.
- Shared Access - The core design team all had access to each course. This allowed the team to see each other's work and opened up the ability to peer review and collaborate together.
- No Login - Course Authors and contributors were able to participate in the design process but didn't need to register for an account. This also allowed participation from those outside the organisation.
- Customisable - The ability to create and define workspaces that were fit for purpose meant the team could develop work areas just for their course, but also amend existing templates and areas.
- Feature Rich - The tool provided much more than post-it notes, and provided the team with a variety of ways to visualise aspects of the course, communicate through comments, draw and capture data.
The Course Workspace
We developed and refined what became known as the Course Workspace—a Miro board template that provided a structured yet flexible environment for course design.
The workspace included eight unique frames, each serving a specific purpose in the design process:
1. Course Information
This frame includes the course name, course code and course description alongside links to the course's box folder, assessment briefs, course design brief, learning patterns and Smart Storyboard. This was useful for the development team and course author to refer to when looking up documents and resources.
2. Course Context
This frame includes the program graphic, program context information and the contact list. The program context information helps to position the course and if it needs to align to one or two programs, if it is core or elective, and if it has been slated to align to professional development, research, career readiness or capstone areas in one of the programs.
3. Course Questionnaire
Used as part of the kick-off workshop, the questions stimulate a discussion about the broader aspects of the course and introduce Course Authors to Miro with a practical task. Course Authors are asked to respond to each of the questions to aid the higher level conceptualisation of the course and its intent. Additional questions can be added that relate to additional courses, related material, sample assessments, student concerns, or information from student evaluations.
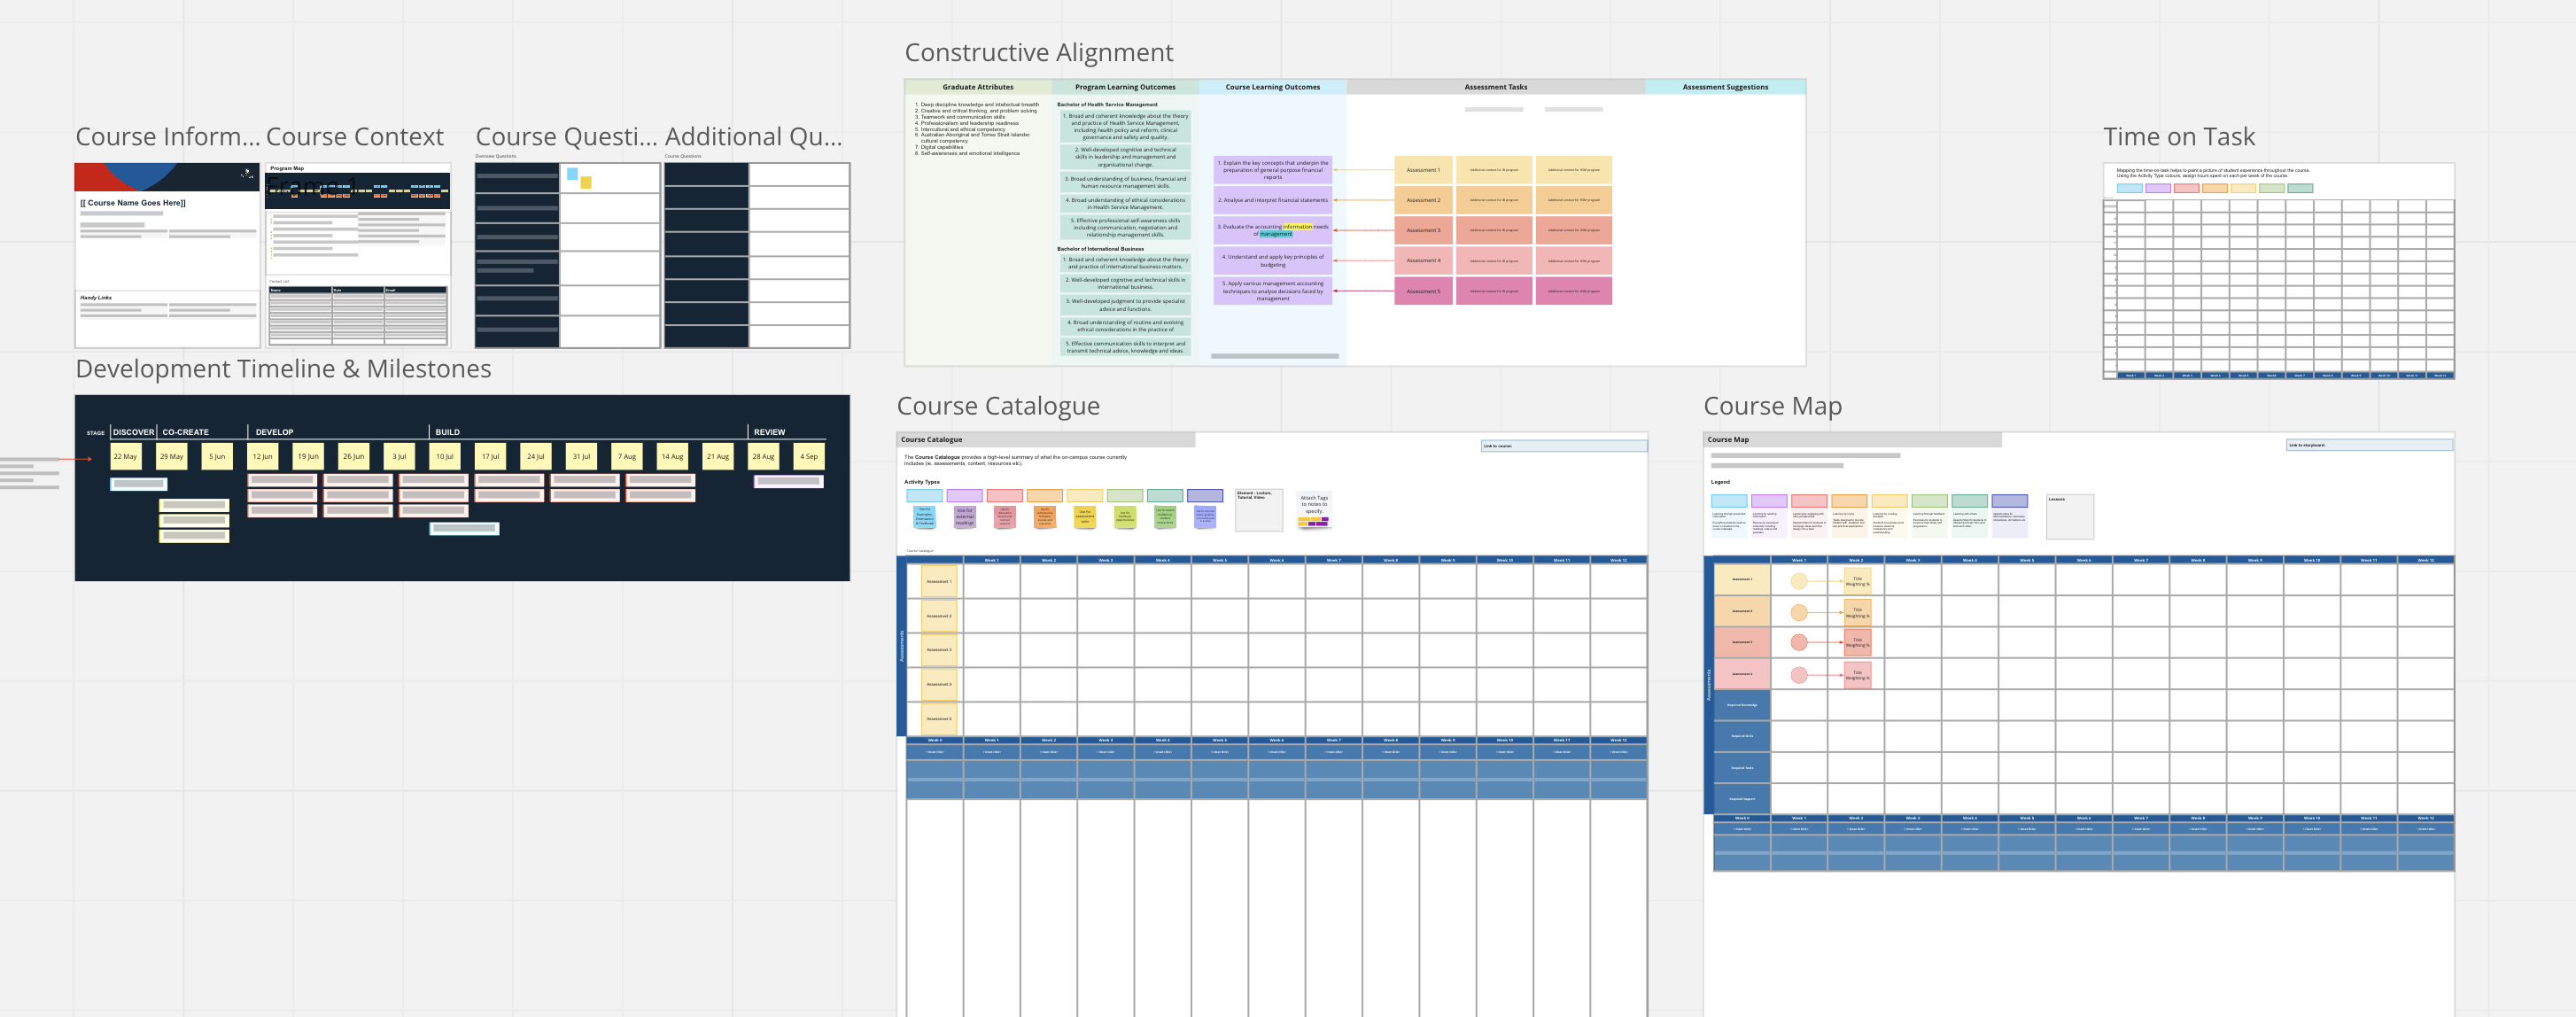
4. Constructive Alignment
This frame provides a workspace for discussion about alignment between Graduate Attributes (GAs), Program Learning Outcomes (PLOs) for both programs and the Course Learning Outcomes (CLOs). The frame used the visual element of Miro to allow connections to be drawn directly between these elements rather than map via a spreadsheet. The same functionality is applied to the assessment tasks allowing direct links to the CLOs visually using the arrow connections.
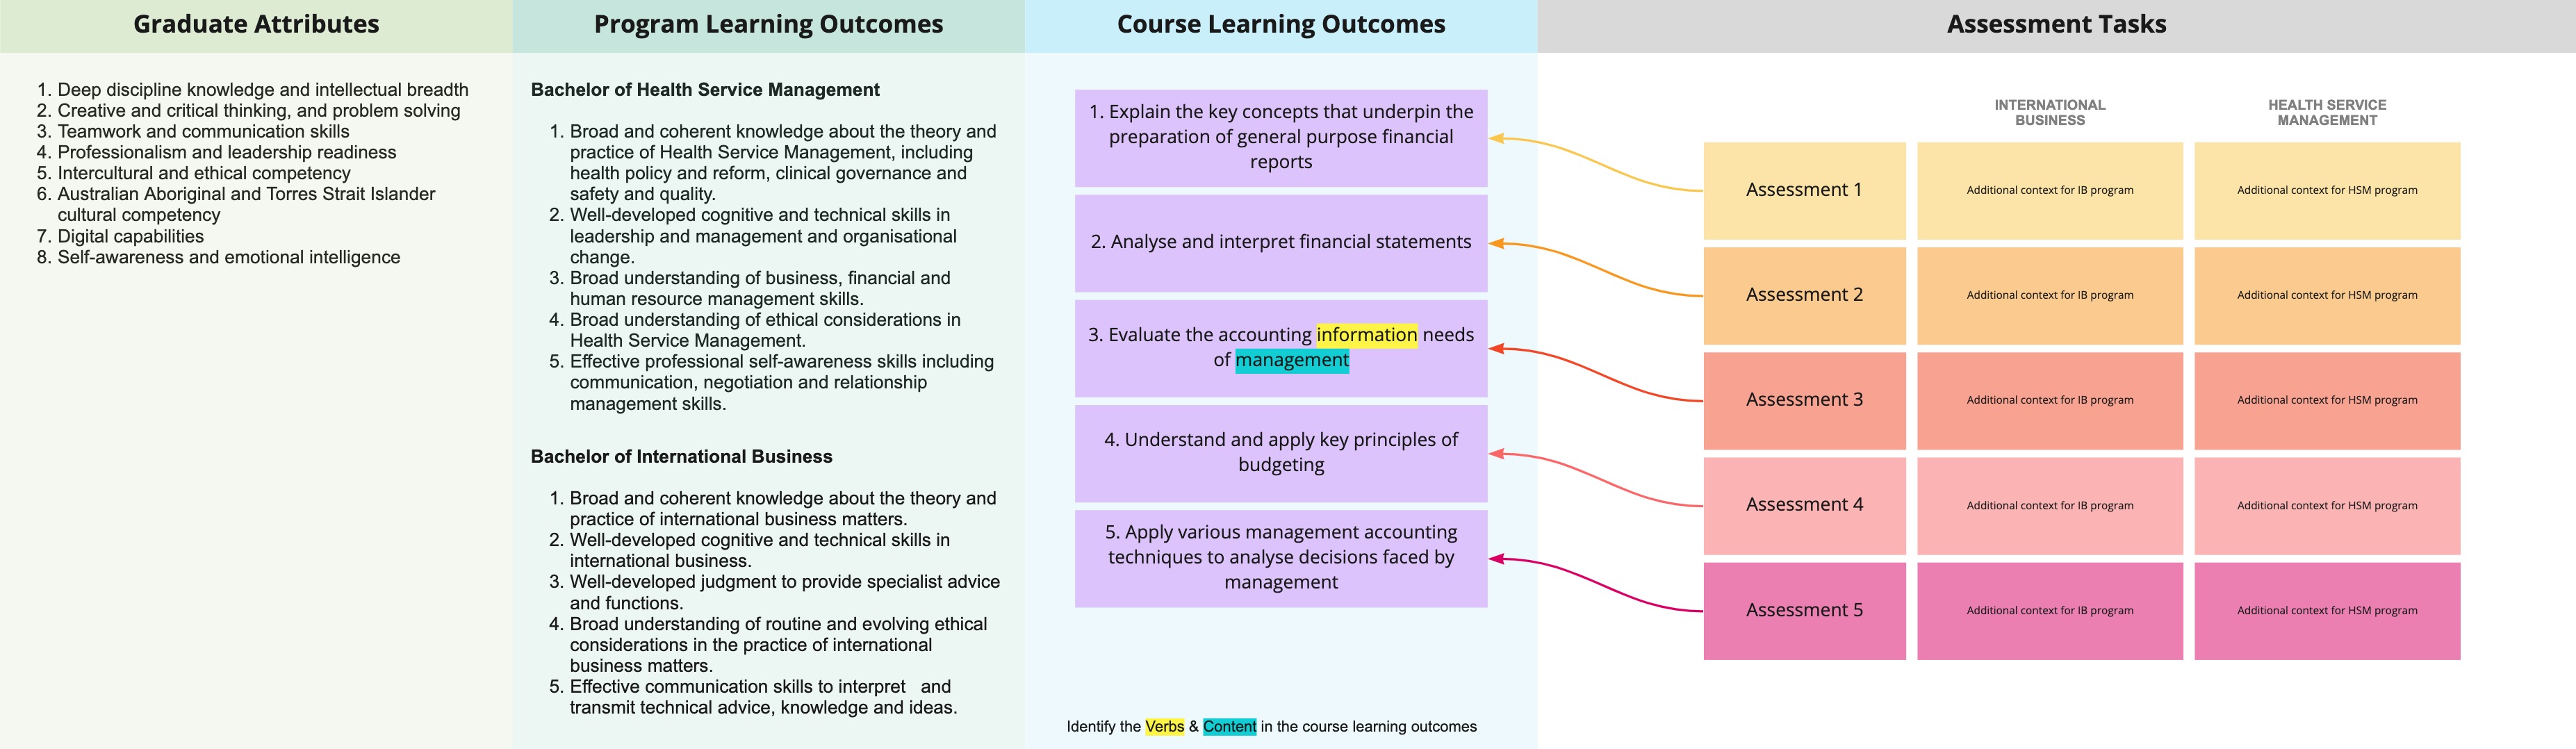
5. Time on Task
This frame is designed to capture the student experience across the trimester by capturing what students will be working on during the 13 hours of study across the 12 weeks of the course. Using the Learning Types colour palette to allocate a background colour to each cell (where 1 cell = 1 hour) allows a quick understanding of the student experience to be formed. This helps to develop a budget for learning activities and provides a checkpoint that all Learning Types appear across the course, and facilitate discussion to modify the design.
6. Development Timeline and Milestones
Milestones for the development cycle are collaboratively set with the Course Author(s). The timeline uses the actual dates from the course to establish when key components of the work are going to be completed. This information is then aligned to the internal project tracking via Jira Milestones to ensure accurate reporting.
This process allows the timelines to be customised according to availability and on the effort required to do the different pieces of work throughout the process. This participation in establishing the milestones helps to develop buy-in to the process and align the needs of the course to the resourcing available.
INSERT IMAGE
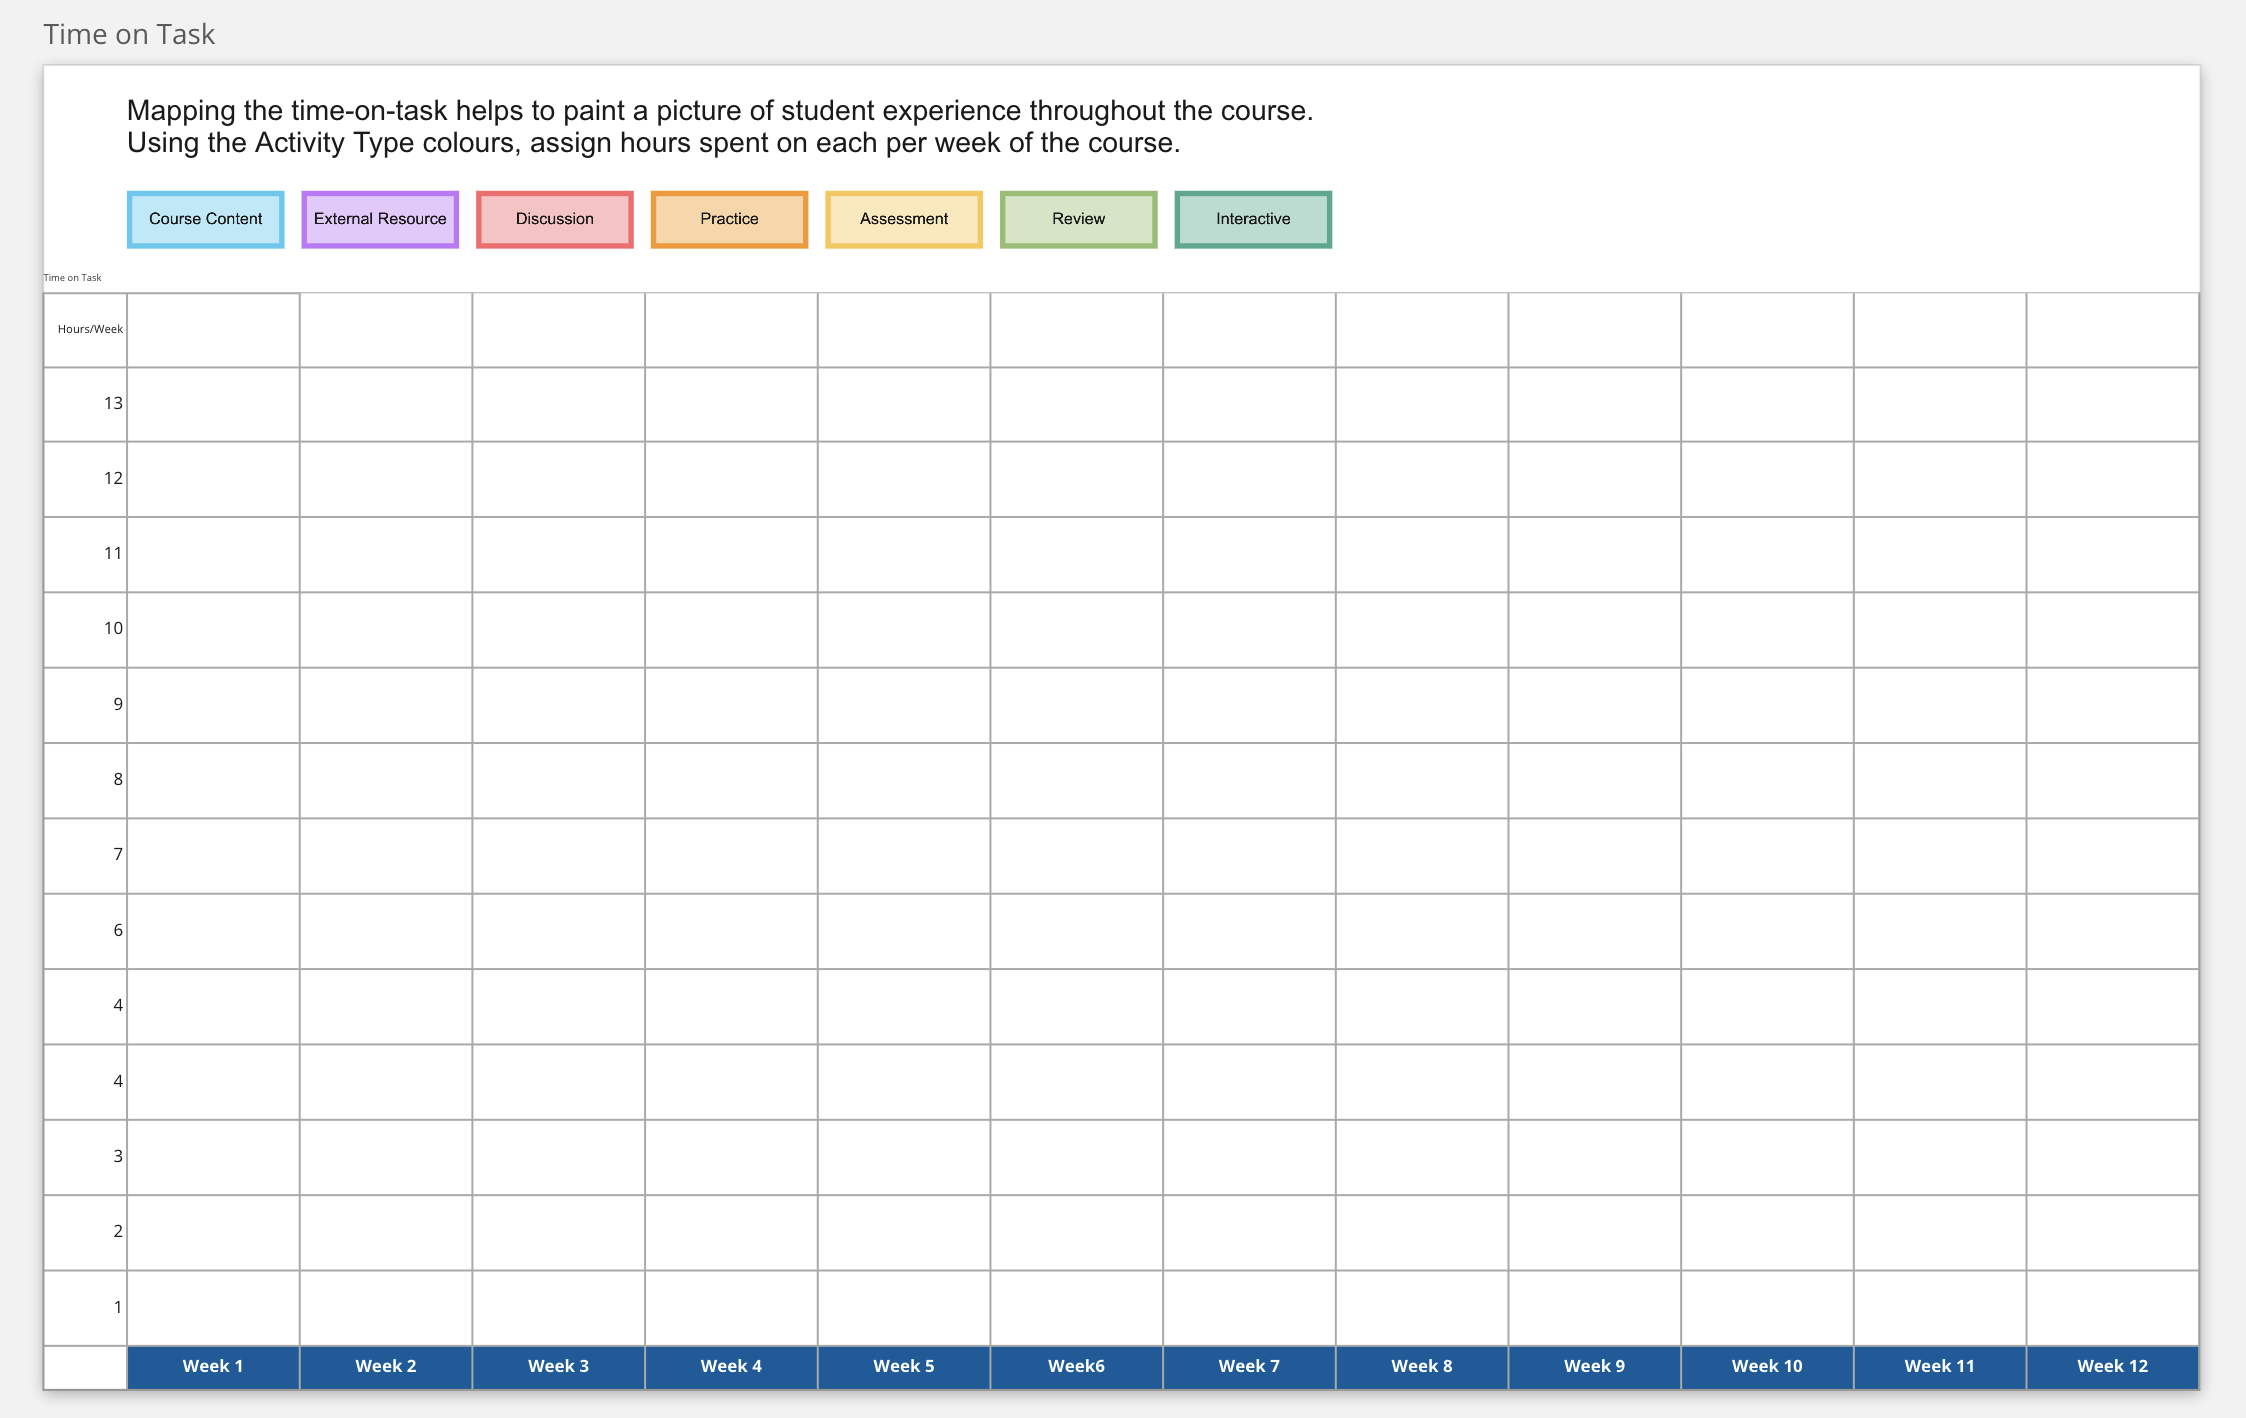
7. Course Catalogue
The Course Catalogue is a detailed log of all the information available in the most recent on-campus course. The Course Catalogue is a map of the existing structure and audit of the learning experience and available resources. Learning Types are used to colour-code the types of student activity present in the course. Key elements of the course and individual resources can be marked out using the grey shape and notes or shapes added to it to make it easier to identify what material can be reused or re-purposed. Assessments are mapped along the 12-week timeline. The format they take (quiz/report/presentation etc), when they occur and their weighting as a percentage are captured. Existing week numbers, titles and topics addressed each week are added to show the existing structure. The content for the course is mapped according to this structure which may include readings, videos, written content, lectures, slides etc.
This helps to provide the Learning Designer an opportunity to delve deeply into the course and familiarise themselves with it before the development kicks off. It helps to note what can be used, reused and redeveloped in the new course.
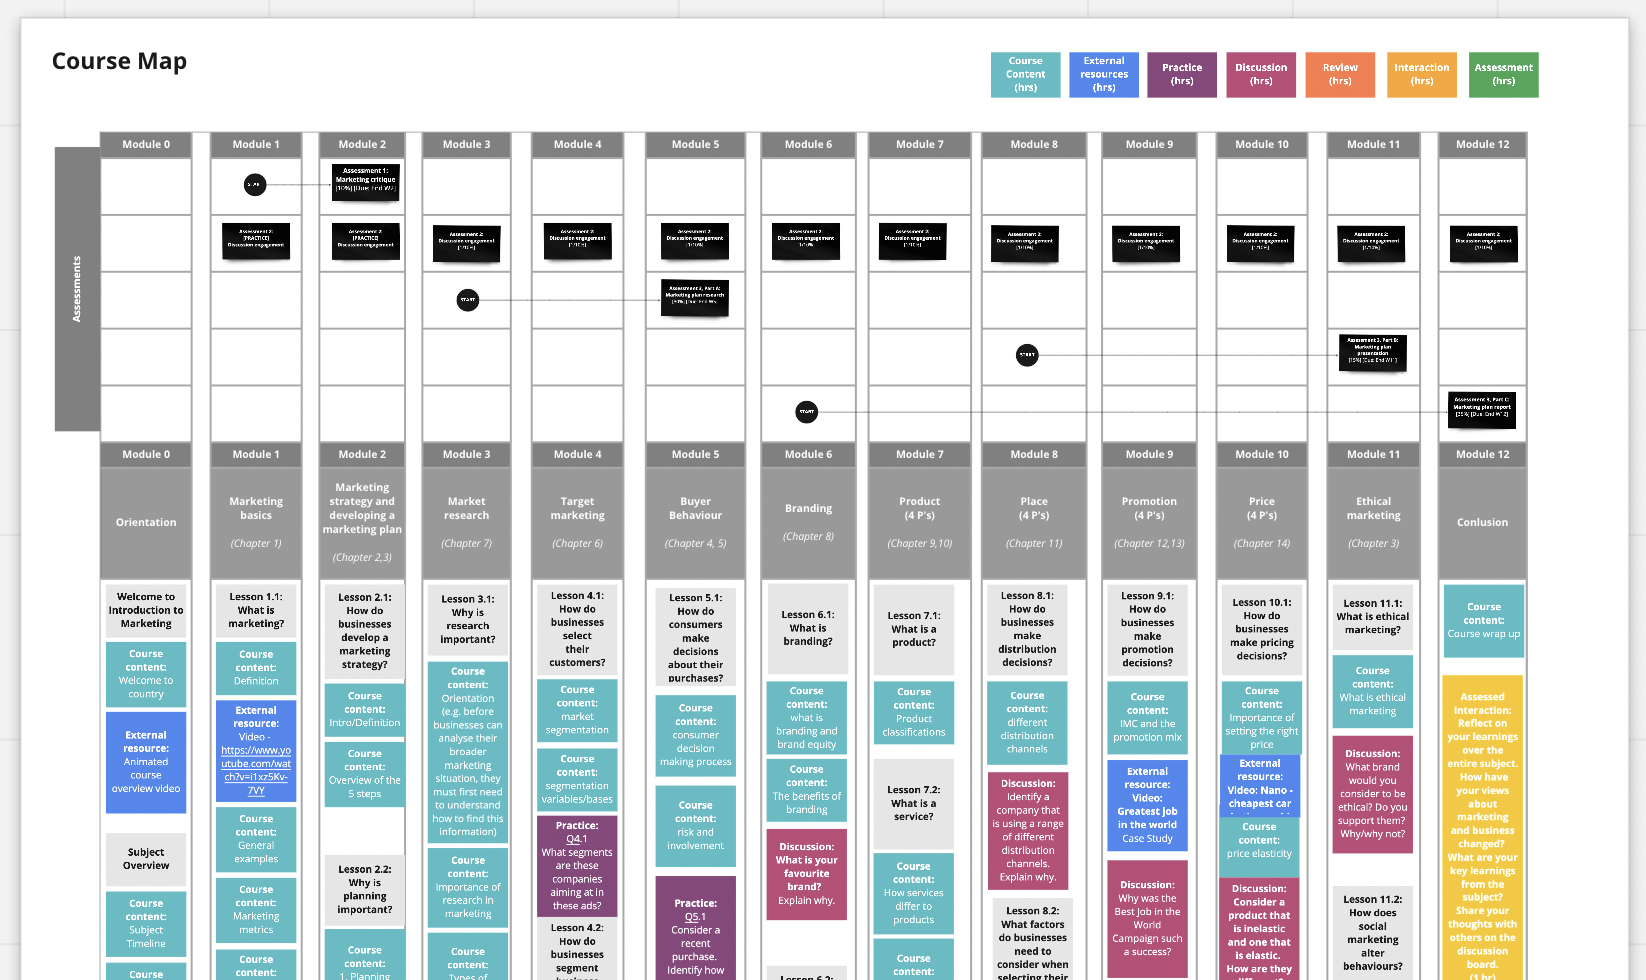
8. Course Map
This table follows a similar layout to the Course Catalogue but is for the new course and developed during the co-creation stage with the Course Author. The Learning Types colours are used for notes and include some explainer text to help define what the activity types are aligned to and how they can be used to chart the student experience.
At the end of the course map, there should be 12 weeks of lessons planned, assessments mapped to when they will occur in the course, and detailed lesson outlines for each week.
Using the Course Workspace
Collaborative Co-design
The Course Workspace enabled genuine collaboration between Learning Designers and Course Authors throughout the early design process. Rather than working in isolation or passing documents back and forth, we could work simultaneously in the same space. This allowed for better co-working as regardless of our individual location we could see each other's contributions in real-time. The visual nature of Miro made the development of the Course Map less abstract as lessons came together and their ideas took shape immediately. The canvas space also allowed the course to be seen as a whole from the outset. The student journey was visible, as was the sequence of learning.Issues in the flow and timing of topics could be identified and resolved easily, allowing the course to evolve throughout the process.
The no-login requirement for contributors meant we could include subject matter experts, guest lecturers, and industry partners in the design conversation without technical barriers. Comments, sticky notes, and drawing tools facilitated asynchronous collaboration, allowing team members to contribute when it suited their schedules while maintaining a clear record of decisions and discussions.
Visualising the Course
The Course Workspace transformed course design from a text-heavy documentation process into a visual experience. For example the Time on Task frame, with its Learning Types colour coding, provided an immediate snapshot of the student experience making imbalances and gaps obvious at a glance. The Constructive Alignment frame allowed us to literally draw connections between Graduate Attributes, Program Learning Outcomes, and Course Learning Outcomes, making abstract alignment requirements concrete and verifiable.
This visual approach helped Course Authors see their course as students would experience it — as a journey over time with varying types of engagement rather than as a collection of topics and content. The Course Map's week-by-week layout made pacing visible, helping us identify where students might be overwhelmed or under-engaged. These visualisations became powerful tools for discussion and decision-making, allowing teams to point to specific elements and explore alternatives together.
A Complete Plan
By the end of the design process, the Course Workspace contained a comprehensive plan for the entire course. Every frame contributed to a complete picture: the Course Information and Context frames established the foundations, the Questionnaire captured intent and philosophy, Constructive Alignment ensured academic rigour, Time on Task validated the student experience, the Development Timeline set realistic expectations, and the Course Map provided the detailed blueprint for development.
This completeness meant that when development moved into Smart Storyboard, the team had a clear, shared understanding of what needed to be built. The Course Workspace served as a single source of truth that could be referenced throughout development, reducing misunderstandings and rework. It also provided a valuable artifact for future course reviews and iterations, documenting not just what was built, but why design decisions were made.
By embedding the Course Workspace into our design process, we created a collaborative, visual, and comprehensive approach to course design that kept learning at the centre of our work.